[Quick guide] How to create a C# Telegram bot
Quick guide to setup a .NET Telegram Bot and deploy it as a Windows Service
Create the bot definition (Telegram)
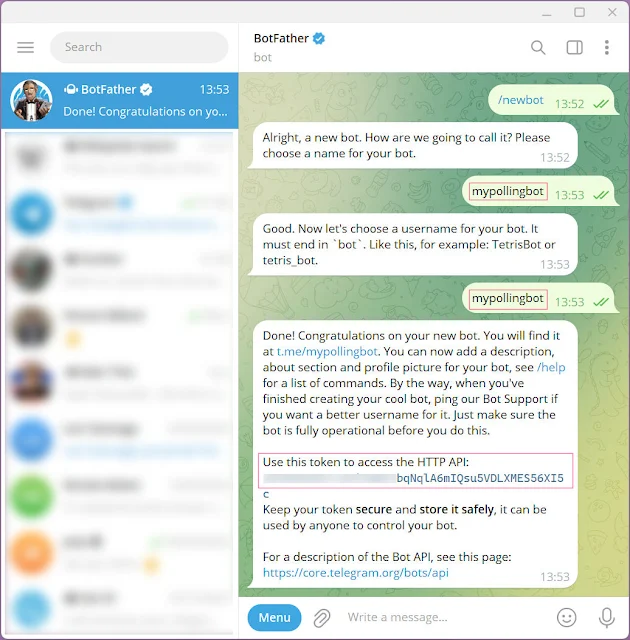
On Telegram, search and use the “botFather” bot (looks like the image below). Once you found the bot, type the ‘/newbot’ command and follow the instructions:
You have to store:
- the TOKEN to access the API
- your bot’s name and user’s name
Once your bot is created, you can customize it by different ways (type ‘/start’ to get the full list of available operations):
General bot communication workflow
After creating your bot, you have to understand the very general main communication workflow for a Telegram bot:
Design a new bot (.NET example)
.NET project using Telegram.BotApi package
We will design a Telegram BOT in .NET. Fot this, we will use the Telegram.BotApi nuget package.
First create a new .NET 8 Project (latest .NET version). ADD tht Telegram.BotApi package (one of the most complete package at this time):
https://www.nuget.org/packages/Telegram.BotAPI/
There are 2 ways to implement your bot:
- create a “polling” loop where you gonna query Telegram for updates in a loop
- Webhooks: where you can define http webhooks that you register to Telegram. The webhooks will be called when updates are available
Polling
We gonna use Polling in this example. That means we implement an infinite loop that will call the ‘GetUpdates()’ method and manage the updates as long as they arrive.
The main part of our bot is (really simple and) described by the code below:
This is how we initialize our bot API client:
        // create bot api client: TOKEN needed here
        _botClient = new TelegramBotClient(**BOT_TOKEN**);
This is our bot main ‘loop’:
   public async Task StartBotAsync(CancellationToken stoppingToken)
   {
       int? updateOffset = null;

			 try{
	       // Get bot updates until we stop the bot
	       while (!stoppingToken.IsCancellationRequested)
	       {
		         // Get latest bot's updates from Telegram Bot server
	           var updates = await _botClient.GetUpdatesAsync(updateOffset);
	           if (updates.Any())
	           {
	               foreach (var update in updates)
	               {
	                   // Process update ==> implement your logic
	                   await ProcessUpdateAsync(update);
	               }

	               // Set next updates offset
	               updateOffset = updates.Last().UpdateId + 1;
	           }
	           else
	           {
	               await Task.Delay(500);
	           }
	       }
	    }
	    catch(OperationCanceledException){
		    // expected cancelation
	    }
   }
This will start an infinite loop that will:
- ‘_botClient’ is of type TelegramBotClient (from the package Telegram.BotApi) and is initialized with the TOKEN that botFather bot gave to us.
- call Telegram Bot server to get any updates coming from Telegram applications
- if there are updates, we process the updates (this is where the ‘business’ coding part will be implemented).
- then to validate that we processed the updates, we have to increase the update offset counter. So the next time we call Telegram Bot server, we will get only non ‘processed’ updates.
💡Good to know:
You can download the Telegram bot SERVER code (for testing purpose & to get more capabilites. you can get the server side code here: https://github.com/tdlib/telegram-bot-api)
💡 Telegram Updates (your bot messages - commands, text, pictures, videos and more coming from your bot’s chats) we will be kept on Telegram servers for a maximum of 24h.
Creating a Windows Service for our bot
In order to get your bot accessible everytime, you may want to install it on a Server. So, if you have a server like a VPS, a solution is to create a Windows service and deploy it on your server.
So the first step is to create a “Worker service”:
Install the latest version of the package: Microsoft.Extensions.Hosting.WindowsServices
Define your service as usually and in your ‘BackgroundService’ class, ‘ExecuteAsync()’ will initialize, start and run your Telegram bot. Check the simple example below:
public class TelegramBotService(ILogger<TelegramBotService> logger, ...)
    : BackgroundService
{

    protected override Task ExecuteAsync(CancellationToken stoppingToken)
    {
        logger.Log(LogLevel.Information, "Starting Telegram bot...");

        // Starts the Telegram bot here
        var botService = new MyTelegramBot("TOKEN_TELGRAMBOT");
        return botService.StartBotAsync(stoppingToken);
    }
}
Then you just have to deploy your Service on your server:
sc.exe create "My Telegram Bot Service" binpath= "C:\\Path\\To\\dotnet.exe C:\\Path\\To\\my.TelegramBot.dll”
Documentation, references
✨Telegram bot documentation:
https://core.telegram.org/bots/tutorial
✨Telegram Inline bots (inline bots are bots that can be called from any chat or group using a reference to it like: ‘@mypollingbot command’
https://core.telegram.org/bots/inline
✨Example of polling bot:
https://github.com/TelegramBots/Telegram.Bot.Examples/tree/master/Telegram.Bot.Examples.Polling
✨Create a Windows service using BackgroundService:
https://learn.microsoft.com/en-us/dotnet/core/extensions/windows-service
.NET, C#, Visual Studio, Telegram, Bot, NET CORE, Telegram.BotApi, LongPolling, Webhooks


Comments
Post a Comment