[Xamarin Forms] Custom bottom bordered entry (iOS & Android)
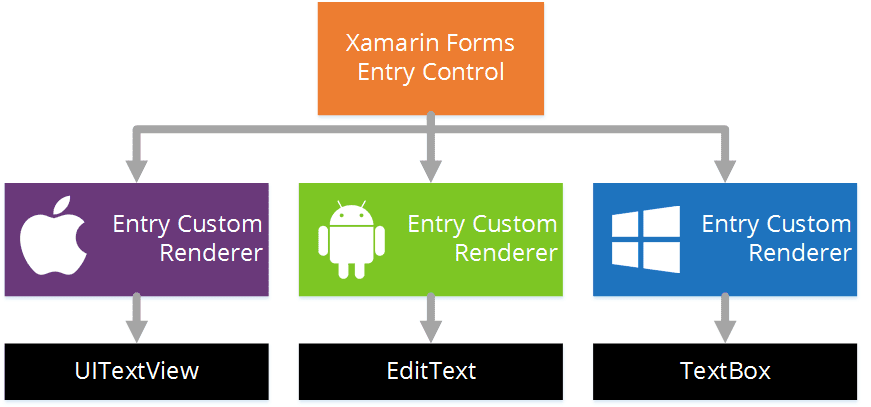
Custom entry with renderers
For that, I used renderers. iOS one is particularly not trivial.
The wished result look like that:

iOS Renderer
[assembly: ExportRenderer(typeof(ExtDatePicker), typeof(ExtDatePickerRenderer))]
namespace MyCompany.iOS.Renderers
{
    public class ExtDatePickerRenderer : DatePickerRenderer
    {
        protected override void OnElementChanged(ElementChangedEventArgs<DatePicker> e)
        {
            base.OnElementChanged(e);


            // Need to connect to Sizechanged event because first render time, Entry has no size (-1).
            if (e.NewElement != null)
                e.NewElement.SizeChanged += (obj, args) =>
                {
                    var xamEl = obj as DatePicker;
                    if (xamEl == null)
                        return;

                    // get native control (UITextField)
                    var entry = this.Control;

                    // Create borders (bottom only)
                    CALayer border = new CALayer();
                    float width = 1.0f;
                    border.BorderColor = new CoreGraphics.CGColor(0.73f, 0.7451f, 0.7647f);  // gray border color
                    border.Frame = new CGRect(x: 0, y: xamEl.Height - width, width: xamEl.Width, height: 1.0f);
                    border.BorderWidth = width;

                    entry.Layer.AddSublayer(border);

                    entry.Layer.MasksToBounds = true;
                    entry.BorderStyle = UITextBorderStyle.None;
                    entry.BackgroundColor = new UIColor(1, 1, 1, 1); // white
                };
        }
    }

}
In iOS, the native control used to represent an 'Entry' is a 'UITextField' control.
The key point is that we need our renderer to update this 'UITextField' on SizeChanged event and not on the traditional 'OnElementChanged' event.
Why because, the size is not yet computed when we enter the 'OnElementChanged' event. So we can draw our bottom line as we don't know its lenght...
Android Renderer
For Android, I decided to make a really simple renderer that will use a drawable resource as a background. Here is how I did:First step, add the xml file that contains the "shape" in your android project resources:

The 'shape' (xml drawable resource)
To make the bottom line, I found on Stackoverflow a nice solution. You just have to generate a gradient from the desired border color to the transparent color with the border color having a really small height (making a line).
Here is the code:
<?xml version="1.0" encoding="utf-8" ?>
<shape xmlns:android="http://schemas.android.com/apk/res/android" android:shape="rectangle">
  <gradient android:angle="90"
            android:startColor="#FFBBBEC3"
            android:centerColor="@android:color/transparent"
            android:centerX="0.01"
            />
</shape>
And finally the renderer:
[assembly: ExportRenderer(typeof(ExtEntry), typeof(ExtEntryRenderer))]
namespace GoodChapp.Android.Renderers
{
    public class ExtEntryRenderer : EntryRenderer
    {

        protected override void OnElementChanged(ElementChangedEventArgs e)
        {
            base.OnElementChanged(e);

            if (Control != null)
            {
                // Background
                Control.SetBackgroundResource(Resource.Drawable.ExtEntryShape);
            }
        }
    }
}
The final results (Android & iOS)


Surely, you can change the border color and any other properties !


Great article, it works like a charm!
ReplyDeletewhy IOS's Render is ExtDatePicker? i can't find it.
ReplyDelete'ExtDatePicker' is a custom (simple) control.
DeleteIt inherits from the Xamarin (Forms) DatePicker control.
You make it just to associate the renderer with this type of control and NOT ALL the DatePicker controls.
If you want to apply your renderer to all of your 'DatePicker' controls, don't make this intermediate control and change your ExportRenderer attribute to target the native Xamarin Forms DatePicker control...
Hope this helps.
I'm new in Xamarin, Where do I must place the code in iOS, or how am I going to call it to work?
ReplyDeleteI'm new in Xamarin, Where do I must place the code in iOS, or how am I going to call it to work?
ReplyDeleteHi,
Deleteyour renderer implementation must be placed in a speratated class (in this case called "ExtEntryRenderer ", in your Xamarin.iOS project.
For instance, you can create a folder called "Renderers" in your Xamarin.iOS project then put all your renderers inside.
If you follow the given syntax, it will be automatically discovered and used at startup.
To sum up:
- Custom control --> Xamarin.Forms project
- iOS Renderer --> Xamarin.iOS project
- Android Renderer --> Xamarin.Android project
Take a look at this article; it's well explained:
https://developer.xamarin.com/guides/xamarin-forms/application-fundamentals/custom-renderer/entry/